

How To Clean The Hot Water Tank
How to Affluent a Water Heater
Extend the life of your water heater: Learn how to bleed water heater fluid and get your water heater running like new.
![]() Time
Time
A few hours
![]() Complexity
Complexity
Intermediate
![]() Toll
Toll
$51–100
Introduction
Have you flushed your water heater lately? This important chore should exist done at least once a twelvemonth to remove sediment that accumulates on the bottom of the tank. That's especially true if you lot alive in a hard-water area. The task is easy to ignore because it's out of sight—but built-up sediment reduces the heating efficiency of your water heater and costs yous coin.
Tools Required
Materials Required
- 1-1/four-in. ten ane-1/2-in. female PVC trap adapter
- 2" brass nipple
- 24-in. piece of 1/2-in. I.D. vinyl tubing
- iii/iv-in. MIP 10 1/2-in. barb fitting
- 3/iv-in. ten 3-in. nipple
- Contumely ball valve
- Brass elbow
- Dielectric nipple
- Garden hose adapter
- Shop vacuum hose adapter
If you've never flushed your water heater, or haven't done it in years, you could exist in for a nasty surprise—in the form of sediment build-upward that can shorten the life of your heater. Ane sign of excessive sediment buildup is a popping or rumbling audio coming from your h2o heater. That'south the sound of steam bubbling percolating up through the muck. On a gas water heater, the sediment creates hot spots that can damage the tank and crusade premature failure. On an electric water heater, sediment buildup can cause the lower heating element to fail. So learning how to drain a water heater and flushing offers a payback in lower energy bills and extended heater life.
This is what the sediment in your water heater looks like.
Projection step-by-step (eight)
Step ane
Build a Shop Vacuum Adapter
- Glue a 1-1/2-inch PVC x 3/4-inch FIP adapter (A) onto a female person PVC trap adapter (B).
- Notation: This allows you to adhere your vacuum to 3/4-inch pipe. The barbed fitting (C) connects to 1/2-inch I.D. vinyl tubing.

Stride 2
Drain Water Heater Liquid
- Shut off the gas or electricity to the water heater.
- Open a hot h2o faucet and permit it run total blast for about 10 minutes to reduce the h2o temperature in the tank.
- Shut off the cold water valve at the top of the tank and adhere a garden hose to the existing drain valve and route information technology to a flooring drain.
- Pro tip: Use a kitchen colander to catch the sediment so it doesn't clog the floor bleed.
- Open a hot water faucet on an upper flooring and the water heater drain valve.
- Permit the tank drain until sediment clogs the valve and reduces the flow.
- Close the upstairs hot h2o faucet and water heater bleed valve.
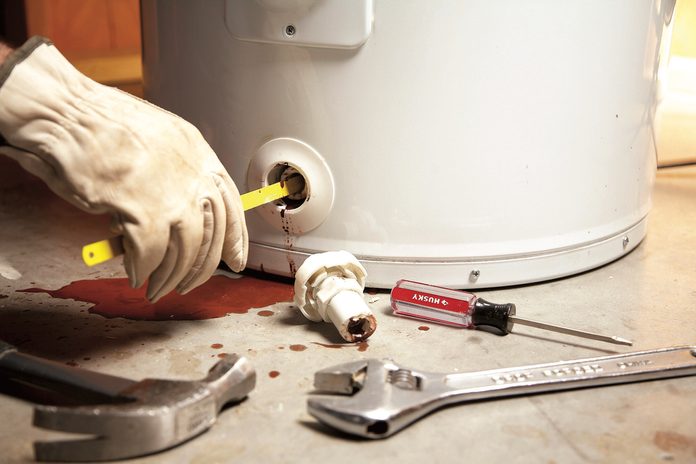
- Remove the temperature-force per unit area release valve and screw in the vacuum adapter.
- Attach the shop vacuum hose and burn down up the vacuum.
- Note: This applies suction to the tank then you won't get soaked when you yank the old drain valve.

![]()
Footstep three
Remove the Old Valve
- While applying suction through the TPR port with a shop vacuum, unscrew and remove the valve by turning the plastic nut behind the knob.
- Pro tip: If it breaks off, saw the cleaved portion with a hacksaw bract until you hit metallic threads. And then use a hammer and screwdriver to chip out the pieces.
Step iv
Assemble the New Valve
- Remove the handle from the ball valve so you can get together all the 3/4-inch fittings.
- Build a new drain valve with a iii/four-inch full-port contumely brawl valve with threaded ends, a iii-inch x iii/4-inch galvanized nipple and a 3/iv-inch MIP x G.H. garden hose adapter (i choice is the BrassCraft/Plumbshop No. HU22-12-12TP).
- Note: As shortly as you open up the drain valve, the sediment volition likely clog it and prevent yous from closing the valve all the way after it'due south tuckered. Then yous'll have sediment buildup and a leaking water heater. Not only volition an one-time drain clog up, just you won't be able to suck droppings through its small opening. This is why you demand to build a new drain valve.
Step 5
Install the New Valve
- Install the new total-port valve in airtight position.
- Attach one terminate of the garden hose to the valve and run the other end into a colander gear up over the flooring bleed.

Circumspection!
Remove the ball valve handle after you lot flush the h2o heater, especially if the water heater is located where people could walk by it and accidentally crash-land the handle. The valve could open and release scalding water, causing serious burns. (Twist-tie the handle to the valve so you don't lose it.)
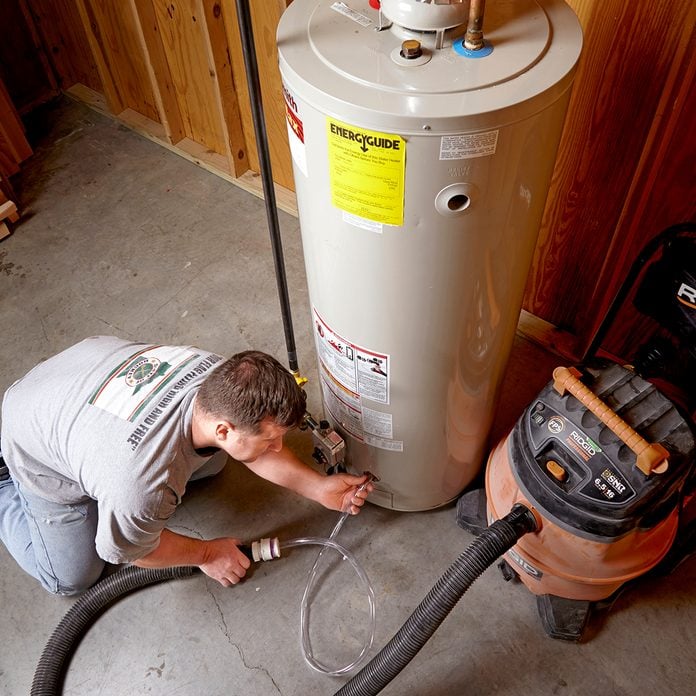
Step half dozen
Affluent the Tank
- Remove the vacuum hose from the TPR port and flush the tank.
- Pro tip: Most of the sediment will affluent out through the full-port valve. To remove the rest, open the cold water valve at the summit of the tank in brusque bursts to blast it toward the bleed.
- Allow the water flow until it runs clear.

Step 7
Suck Out the Sediment
- Remove the full-port valve and suck out the remaining sediment with your store vacuum adapter and one/ii-inch vinyl tubing.
- When yous're done, close the brawl valve and go out it in place, but remove the lever handle to prevent accidental opening.
- Then reinstall the TPR valve and blow-off tube.
Step 8
Refill the H2o Heater
- Refill the h2o heater.
- Turn on the gas or electricity.
Originally Published: Oct 01, 2020

How To Clean The Hot Water Tank,
Source: https://www.familyhandyman.com/project/how-to-flush-a-water-heater/
Posted by: densonenterce.blogspot.com
0 Response to "How To Clean The Hot Water Tank"
Post a Comment